Set up Agent
Menu location: Maintenance menu, System Administration, Set Up Agent
The Agent must be installed on a server for your site. It is not automatically installed. Call support for installation assistance.
The Set Up Agent feature allows you to create the schedules used to submit claim files from your local system to Assurance. (To set up automatic movement of files from Assurance to your site, use sweep time within the auto print feature.)
You can make multiple additions, changes, and deletions to submission schedules without leaving the Set Up Agent page.
Important
To update changes, stop and restart Agent. This action sends the changes back and forth between the Agent on your site and Assurance.
| Topic | Setup |
|---|---|
| Auto Submit field |
Note: Additions and modifications are saved in a batch when you click OK.
|
| *Name field |
|
Files:
|
CUF files: You must use the Agent to automatically send CUF files to Assurance as soon as the files are ready.
Note: Set up the File Type feature to have Agent pick up and download your 277 claim status response files. Customer-Submitted Remit 835 files: Use Agent to automatically import ANSI 835 files into Assurance:
Note: The first three characters of the file name must be the LOB that matches the file you're importing. Aii files: You must use the Agent to automatically send Aii Advanced Inquiry Interface (Aii) is the program that queries Medicare for early adjudication results. Largely replaced by Medicare Direct Entry (MDE). files to Assurance as soon as the files are ready.
|
| Enable checkbox |
|
| Enable batching checkbox |
Note: By default, Enable Batching will be “off” (i.e., this checkbox will be empty).
|
| Schedule panel |
|
Notes
- Click the Add or Update button before selecting the next schedule in the Auto Submit list or leaving the page.
- If your system creates files at night and you use the Agent to send them at night, do not shut down the Auto Agent service.
- If your site auto submits claim files, you must actively monitor the submission process.
- If the Submission type you select submits a series of files (claim submission and associated content files), identification fields for each possible content file will display directly below Claim File Mask. Add paths and masks for each required (*) file.
- To temporarily prevent a list from running, clear the Enable checkbox. Then stop and restart Agent.
- The File Mask field must contain the path to the folder on your local system where the file should be placed. The Agent workstation must be able to access the folder. It also needs to contain a file name. You can use standard Windows wildcards. Example: C:\Downloads\Reports\*.PDF.
- When the Enable Batching checkbox is selected, Auto Agent will do the following:
- Rename the batched copies of the files so they are not added to a batch more than once
- Batch the files for the submission and submit as a single batch (file)
- Run the batch process before Auto Agent submits the file
- Log the names of the files that it batches and the name of the file it produces for troubleshooting purposes
Note: The filename naming convention will include the Interface Name from the Bridge Master (in red), the word "BATCH" (in blue) the date and time stamp (in green), and the original base name (in pink), removing any sequence numbers.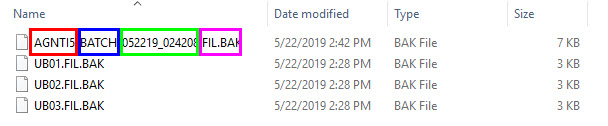
- Schedule panel: Beginning at the From time and until the Through time, the Agent will Check status every [#] minutes for the presence of any file using the mask you enter. When the file is found, it is automatically sent to Assurance.