Set up remit import options
Menu location: Maintenance menu, System Administration, Remit Import Options
Complete payer set up for importing remits and creating secondary claims from the payment information requires that you set up both remit import options and secondary billing. Secondary Billing establishes rules for creating secondary claims according to the requirements of the secondary payers. Use Remit Import Options to specify how you want the remittance data handled during import.
Follow these steps to set up Remit Import Options:
- Select Add A New Remit LOB from the Remit LOBs panel.
- Select a Remit LOB from the drop down list.
- Choose the criteria that meet your business needs.
- Click Add.
- Click OK.
| Field | Description |
|---|---|
| Auto Accept | How does your site want to process the remittance data into secondary claims?
|
| Create secondary for crossovers (R/A only) | Select the checkbox to allow the creation of secondary claim even though the secondary payer and the primary payer have a crossover agreement. |
| Matching Criteria |
You can use one or more of these options if you find that certain remit lines of business often fail to match your existing claims using the standard system rules for matching.
|
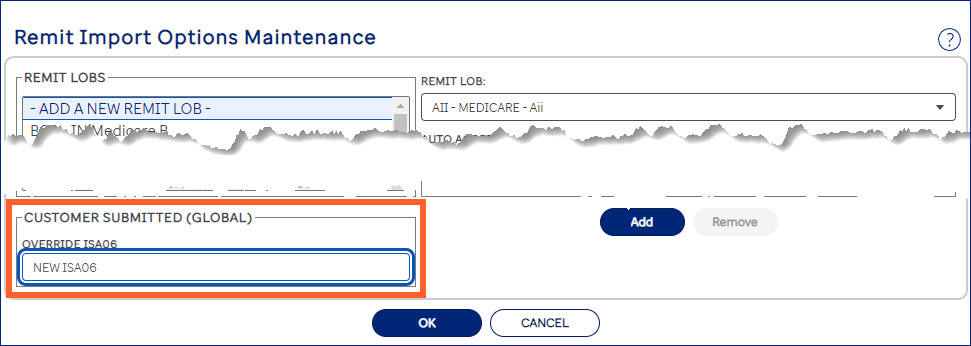
| Override ISA06 (for Customer-submitted remits only) |
Use this field to override the ISA06 value in a customer-submitted remit file. This allows customers a means of having normalized data to post into a health information system (HIS) or another application.
Note: This field only appears if Submit Remit File is enabled in Configure Client. |
Matching criteria
When the system imports a remit file, the standard matching rules use the general line of business, patient control number and total charges. If this check returns multiple claims, then the system adds data elements to the standard matching rules in this order: Statement From Date, Statement Thru Date, Insured ID, and Medical Record Number. If there are too many matches or no matches, then the system stores the remit as unmatched.
To always use the standard matching rules, leave the Matching Criteria section empty. To add rules, choose a specific remit line of business, and then select the appropriate checkbox(es).
You can click the Copy button to apply any Matching Criteria settings to all of your remit lines of business. Please note that this action overwrites any Matching Criteria settings already selected for another remit line of business, so make sure you really want to apply the same rules globally. This action does not change any other import or crossover settings.
If the Statement From Date, Statement Thru Date, Insured ID, and Medical Record Number claim fields are empty, then the system must stop the matching process. It cannot apply any added rules. The remit is stored as unmatched.
Most recent
Select this checkbox to add this rule when the system finds too many potential matching claim candidates using standard matching. When selected, the system will match the Claim Received Date on the remit to the claim with the closest release date, as long as the release date is on or before the remit date. The system applies status code 210 (Matching Remit Available) and 211 (Remit Best Match) in the claim history.
Alternate matching
Select this checkbox to add these rules when the system cannot find any matching claim candidates using the standard matching process.
- The system excludes total charges from the standard matching rules. If the system finds a match, it applies status code 210 (Matching Remit Available) and 212 (Remit Match tot chg) in the claim history.
- If there is still no match, then the system will remove any character that is not alpha or numeric from the remit and claim patient control numbers. If the system finds a match, it applies status code 210 (Matching Remit Available) and 213 (Remit Match p_cntrl) in the claim history.
Patient ID matching
Select this checkbox to add this rule if the system cannot find any matches for claims with the standard matching rules. When selected, the system will first use the standard matching criteria and any alternate matching criteria, when enabled. If no matches are found, then the system uses the listed criteria to identify a matching claim. If the system finds a match, it applies status code 210 (Matching Remit Available) and 216 (Remit Alternate Patient ID Match) in the claim history.
All listed field information between the remit and claim must match for the import to be successful:
- Patient Control Number
- Total Charges
- Statement From and Thru Dates
The system uses the Claim Statement Period Start from the remit (DTM01 = 232 in Loop 2100) to determine if it falls within the claim date range. If the Claim Statement Period Start date is missing, then the system uses the oldest Service date on the remit (DTM01 = 472 in Loop 2110) to check against the claim date range. - Patient ID
The system compares the Patient Identifier value from the remit (the NM109 value when the NM108 qualifying code is 34, HN, MI, or MR in Loop 2100) against the claim value in the TP_CERT field.
If multiple matches are found with this method, the system will apply the Most Recent criteria to select a matching claim, if the rule is enabled within Remit Import Options.
Results using this option will vary based on the data provided in the claim and the data returned by the payer in the remit.
Overriding the ISA06 segment
For clients that need a normalized ISA06 segment to post into a Health Information System (HIS), Assurance allows you to override the ISA06 segment and GS02 segment for remits that are submitted into Assurance using Customer-Submitted Remit functionality.
If the Submit Remit File option is enabled in Configure Client, the Override ISA06 field will allow you to set your own value for the ISA06 segment.
When a value is entered into the Override ISA06 field, it must meet the following criteria:
- The characters can be letters, numbers, or spaces.
- No special characters are allowed.
Which changes appear in the remit file?
When you enter a value into the Override ISA06 field, Assurance updates the customer-submitted remit file with that value for the ISA06 segment (padded so that it contains 15 characters) and the value for the GS02 segment (as it was entered). In addition, Assurance sets the value in the ISA05 segment to be ZZ.
Automating the creation of secondary claims (ASC)
When you begin using this product to create secondary claims from your remittance data, you should manually start the processing of at least one remit file from each payer. This is to give you a chance to inspect the payment before creating secondary claims based on it.
After you are familiar with the payer and the remits, you can change Auto Accept to Automatically for the payer. When Automatically is set, you no longer need to manually process payments from that payer. Secondary bills will automatically be created from the remittance data as soon as the file is imported into the database.
You can hold the ASC claims created based on alternate matching logic for user review. Use the global options in the Secondary Billing setup.
- If a payer has not been set up in Remit Import Options and 835 files from that payer are received by the clearinghouse, the remits in the 835 files will not be imported and matched to claims.
- You can run the Payment Matching remit report which contains information about the logic the system uses to match your remit payments to a claim, especially if your site uses any of the alternate remit matching options available.
- If you use Direct Entry or Aii
 Advanced Inquiry Interface (Aii) is the program that queries Medicare for early adjudication results. Largely replaced by Medicare Direct Entry (MDE). to retrieve remittance data from the Medicare FSS, you must set up the AII - MEDICARE - Aii remit LOB.
- Facility Bypass clients - Facility Master is not required for posting remit data from an Aii or Direct Entry file. The remit information will be attached to all claims that have an edit master.
- If you receive 835 files from payers, use the first three characters of the 835 file name to determine which Remit LOB to set up. The first part of the Payer/LOB name in the Remit LOB list corresponds to the first three characters of the 835 file name.
- You can download all remittance files (imported and not imported) to your local system from Download Files. If you do not see file names with the extensions .835 or .Aii in the Download Files list, contact Support and ask that your 835 and Aii files be set to Downloadable. Remittance data from Direct Entry Check Status is not received in a file. It cannot be downloaded to your local system.